Advanced Features
Access Control List (ACL)
Laravolt's Access Control List (ACL) provides a robust system for managing user permissions and roles, giving you fine-grained control over who can access what in your application.
Concept Overview
Before diving into technical details, it's important to understand the general concept and how ACL works.
User
A user is anyone who has an account and can log into the application.
Role
A role, often called a user group, is a way to categorize users with similar access needs. Grouping users by roles makes it easier to manage their permissions.
Examples of roles in real applications:
Hospital Information System
- Administrator
- Doctor
- Nurse
Academic Information System
- Professor
- Student
- Administrative Staff
Online Store
- Store Owner
- Cashier
- Customer Service
A user can have one or more roles. In Laravolt, the User and Role are defined in a Many-to-Many relationship.
Permission
A permission, also called an ability, defines what a user can do within the application. Users need specific permissions to access features.
Examples of permissions in real applications:
Hospital Information System
- Can register patients
- Can view medical records
- Can view financial dashboard
Academic Information System
- Can input course selections
- Can view student profiles
- Can create schedules
Laravolt defines a Many-to-Many relationship between Permissions and Roles. Permissions are attached to Roles, not directly to Users.
Database Structure
The ACL system in Laravolt uses the following tables:
users- Stores user informationacl_roles- Stores role definitionsacl_permissions- Stores permission definitionsacl_role_permission- Junction table for role-permission relationshipsacl_role_user- Junction table for user-role relationships
Access Checking Methods
There are two common methods to check access rights when coding with Laravel:
- Checking Roles
- Checking Permissions
Let's compare the coding approaches for each method.
Checking Roles
// The "hasRole" method is a built-in Laravolt functionif (auth()->user()->hasRole(['Administrator'])) { // Allow access to dashboard}Checking Permissions
if (auth()->user()->can('see_dashboard')) { // Allow access to dashboard}For small applications, role-based checking is often preferred because it's easier to read and more consistent with the business process. Clients usually say, "feature A can only be accessed by admins." The first example is closer to this requirement.
However, role-based checking has a drawback: the code is more susceptible to changes. For example, if requirements change so that both Administrators and Hospital Directors can view the dashboard:
Checking Roles (After Requirement Change)
// We need to add the Hospital Director role hereif (auth()->user()->hasRole(['Administrator', 'Hospital Director'])) { // Allow access to dashboard}Checking Permissions (After Requirement Change)
// No code changes neededif (auth()->user()->can('see_dashboard')) { // Allow access to dashboard}You can see that no code changes are needed if we check by Permission.
Fixed Permissions, Dynamic Roles
If access checking is done against Permissions, then when there are requirement changes related to access rights, you only need to change the permissions of the relevant Roles. This can be done by the system administrator through the provided admin panel.
Conversely, if checking is done against Roles, every time there's a condition change, the application code must also be adjusted. This is not effective. Additionally, role names might change. What happens if "Hospital Director" is changed to "Chief Hospital Director"?
Fixed Permissions, Dynamic Roles
Permissions are fixed in number and name, according to the application's feature definitions. Roles are dynamic; Administrators can add or reduce them as needed. When requirements change regarding access rights, you only need to modify the role-permission mapping.
Registering Permissions
Since Permissions are fixed, we need to define them in one place for easy reference and documentation (single source of truth).
1. Registering Enum
Laravolt's starter kit provides an Enum class for registering Permissions: app\Enums\Permission.php. If this class doesn't exist, you can add it yourself.
app\Enums\Permission.php
<?phpnamespace App\Enums;use BenSampo\Enum\Enum;final class Permission extends Enum{ const DASHBOARD_VIEW = 'dashboard.view'; const POST_VIEW = 'post.view'; const POST_DELETE = 'post.delete';}2. Synchronizing Enums and Permission Table
Because user-role-permission relationships are stored in the database, we need to synchronize to ensure the acl_permissions table content matches the defined enums. Run the command:
php artisan laravolt:sync-permissionAfter registration, we can use these constants for checking:
if (auth()->user()->can(\App\Enums\Permission::POST_DELETE)) { // Do something}Using constants is more recommended than plain strings because:
- It supports autocomplete
- It prevents typos
- It's easier to refactor
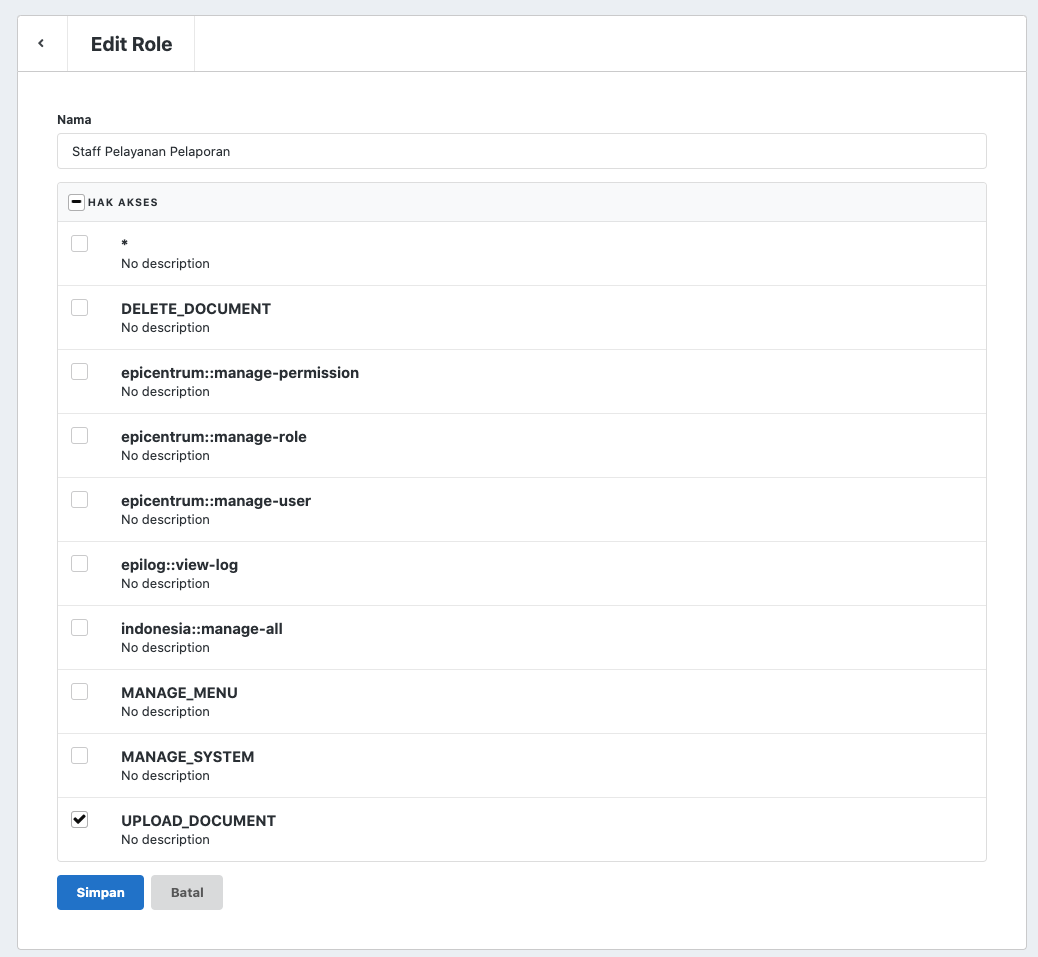
3. Assign Permissions to Roles Through Admin Panel
After Permissions are registered in the database, the application Administrator can manage which Roles have which Permissions through the "System -> Roles" menu.

Since Roles are dynamic, if access rule changes occur, Administrators can make changes independently without asking Programmers to modify the code.
Wildcard Permission
There's a wildcard Permission labeled "*" which allows a Role with this Permission to access all application features. By default, this Permission is added when you run the php artisan laravolt:admin command.
Make sure only the superadmin Role has this Permission.
Implementation Guide
Creating Roles Programmatically
You can create roles programmatically using the Laravolt Role model:
use Laravolt\Platform\Models\Role;// Create a new role$role = Role::create(['name' => 'Editor']);// Or find an existing role$role = Role::whereName('Editor')->first();Assigning Roles to Users
// Using the attachRole method$user->attachRole($role);// Using role ID$user->attachRole($roleId);// Using role name$user->attachRole('Editor');// Attaching multiple roles$user->attachRole(['Editor', 'Reviewer']);Revoking Roles from Users
// Revoke a specific role$user->detachRole($role);$user->detachRole($roleId);$user->detachRole('Editor');// Revoke multiple roles$user->detachRole(['Editor', 'Reviewer']);// Revoke all roles$user->detachAllRoles();Checking User Roles
// Check if user has a role$user->hasRole('Editor'); // returns boolean// Check if user has any of the roles$user->hasAnyRole(['Editor', 'Reviewer']); // returns boolean// Check if user has all roles$user->hasAllRoles(['Editor', 'Reviewer']); // returns booleanManaging Permissions
// Assign permissions to a role$role->attachPermission(\App\Enums\Permission::POST_VIEW);$role->attachPermission([\App\Enums\Permission::POST_VIEW, \App\Enums\Permission::POST_DELETE]);// Revoke permissions from a role$role->detachPermission(\App\Enums\Permission::POST_DELETE);$role->detachPermission([\App\Enums\Permission::POST_VIEW, \App\Enums\Permission::POST_DELETE]);// Revoke all permissions$role->detachAllPermissions();Checking Permissions
// Using the can methodif ($user->can(\App\Enums\Permission::POST_DELETE)) { // User can delete posts}// Using the cannot methodif ($user->cannot(\App\Enums\Permission::POST_DELETE)) { // User cannot delete posts}Access Control in Blade Templates
You can use Laravolt's blade directives to control access in your templates:
@can(\App\Enums\Permission::POST_DELETE) <button class="ui button red">Delete</button>@endcan@role('Administrator') <a href="{{ route('admin.dashboard') }}">Admin Dashboard</a>@endrole@hasrole(['Administrator', 'Manager']) <div class="ui segment"> Management content here </div>@endhasroleProtecting Routes with Middleware
Route-Level Protection
// Single roleRoute::get('/admin', function () { // Only administrators can access})->middleware('role:Administrator');// Multiple roles (any of these roles can access)Route::get('/reports', function () { // Administrators or Managers can access})->middleware('role:Administrator|Manager');// Permission-based protectionRoute::get('/posts/{post}/edit', function () { // Only users with post.edit permission can access})->middleware('permission:' . \App\Enums\Permission::POST_EDIT);// Multiple permissions (all permissions required)Route::get('/posts/{post}/publish', function () { // Need both permissions to access})->middleware('permission:' . \App\Enums\Permission::POST_EDIT . ',' . \App\Enums\Permission::POST_PUBLISH);Controller-Level Protection
class PostController extends Controller{ public function __construct() { // Require post.view permission for all methods in this controller $this->middleware('permission:' . \App\Enums\Permission::POST_VIEW); // Require post.edit permission only for edit and update methods $this->middleware('permission:' . \App\Enums\Permission::POST_EDIT, ['only' => ['edit', 'update']]); // Require post.delete permission only for the destroy method $this->middleware('permission:' . \App\Enums\Permission::POST_DELETE, ['only' => ['destroy']]); } // Controller methods...}Best Practices
Permission Naming Conventions
Follow a consistent naming pattern for permissions:
- Use resource-based naming:
resource.action - Example:
post.create,post.edit,post.delete - Use lowercase with dots as separators
Group Permissions Logically
Organize permissions in the Enum class by grouping them logically:
// Post managementconst POST_VIEW = 'post.view';const POST_CREATE = 'post.create';const POST_EDIT = 'post.edit';const POST_DELETE = 'post.delete';// User managementconst USER_VIEW = 'user.view';const USER_CREATE = 'user.create';const USER_EDIT = 'user.edit';const USER_DELETE = 'user.delete';Use Authorization Policies
For more complex authorization logic, leverage Laravel's Authorization Policies:
// Create a policyphp artisan make:policy PostPolicy --model=PostIn the policy, use Laravolt's permission system:
public function update(User $user, Post $post){ // Basic permission check if (!$user->can(\App\Enums\Permission::POST_EDIT)) { return false; } // Additional logic // For example, users can only edit their own posts return $user->id === $post->user_id;}Then in your controller:
public function edit(Post $post){ $this->authorize('update', $post); // Continue with edit...}Seed Default Roles and Permissions
When setting up a new application, create a seeder for default roles and permissions:
class AclSeeder extends Seeder{ public function run() { // Create roles $admin = \Laravolt\Platform\Models\Role::firstOrCreate(['name' => 'Administrator']); $editor = \Laravolt\Platform\Models\Role::firstOrCreate(['name' => 'Editor']); // Sync permissions from enum to database Artisan::call('laravolt:sync-permission'); // Assign all permissions to admin $admin->attachPermission('*'); // Assign specific permissions to editor $editor->attachPermission([ \App\Enums\Permission::POST_VIEW, \App\Enums\Permission::POST_CREATE, \App\Enums\Permission::POST_EDIT ]); }}Troubleshooting
Permission Not Working
- Make sure the permission is properly registered in the Permission Enum class
- Run
php artisan laravolt:sync-permissionto sync permissions to the database - Check that the permission is correctly assigned to the user's role(s)
- Verify that you're using the correct permission constant in your checks
Role Not Working
- Ensure the role exists in the database
- Verify that the user is correctly assigned to the role
- Check for typos in role names (role checks are case-sensitive)
Migration from Other ACL Systems
If you're migrating from other ACL systems like Spatie's laravel-permission, Laravolt provides a command to help with the transition:
php artisan laravolt:import-permissionThis command will guide you through the process of importing roles and permissions from other systems into Laravolt's ACL structure.