Core Components
Table Component
Laravolt provides a powerful Table component for displaying data in a tabular format with features like searching, sorting, and filtering - all without writing JavaScript.
Introduction
Laravolt Table provides a UI for displaying data in tabular form with supporting features like searching, sorting, and filtering. Built on Livewire, tables can be interacted with without full page refreshes. You don't need to worry about JavaScript because all UI-related aspects are already handled by Laravolt - just focus on writing PHP code.
Creating Tables
Because tables are built on Livewire, all Table classes are stored in the app\Http\Livewire\Table folder. To create a new Table, run the make:table command:
php artisan make:table UserTableThen, define your data source and the columns to display:
use Laravolt\Suitable\Columns\Text;class UserTable extends TableView{ public function data() { return \App\Models\User::where('status', 'ACTIVE')->paginate(); } public function columns(): array { return [ Text::make('name', 'Name'), Text::make('email', 'Email'), ]; }}Displaying Tables
To display a table, simply call the Blade component or directive from your view:
<livewire:table.user-table />// or@livewire('table.user-table')// or@livewire(\App\Http\Livewire\Table\UserTable::class)Reference
Data Sources
Laravolt Table can process several types of data sources to display in a table. The available options for the data() method return value are:
- Array
- Collection
- Eloquent
- Query Builder
- Response from HTTP Client
Array
The simplest data source is an array:
public function data(){ return [ ['name' => 'Andi', 'email' => 'andi@example.com'], ['name' => 'Budi', 'email' => 'budi@example.com'], ];}Collection
You can also use \Illuminate\Support\Collection as a data source:
public function data(){ $users = [ ['name' => 'Andi', 'email' => 'andi@example.com'], ['name' => 'Budi', 'email' => 'budi@example.com'], ['name' => 'Citra', 'email' => null], ]; return collect($users)->reject(fn($user) => $user->email === null);}Eloquent
The most commonly used data source is Eloquent:
use App\Models\User;public function data(){ return User::whereNull('deleted_at')->paginate();}If you don't need pagination, you can directly call get():
use App\Models\User;public function data(){ return User::query()->whereNull('deleted_at')->get();}Query Builder
If Eloquent isn't your preference and you prefer Query Builder, you can still apply the same approach:
public function data(){ return \DB::table('users')->whereNull('email')->paginate();}Or without pagination:
public function data(){ return \DB::table('users')->get();}Response From HTTP Client
To retrieve data directly from an API, you can use Laravel's built-in HTTP Client:
use Illuminate\Support\Facades\Http;public function data(){ return Http::get('https://jsonplaceholder.typicode.com/users');}Column Types
Laravolt Table provides various column types to display different kinds of data appropriately:
Avatar
The Avatar column automatically displays avatar images generated from initials. In the example below, the email initials will be used to generate an appropriate avatar image:
use Laravolt\Suitable\Columns\Avatar;public function columns(): array{ return [ Avatar::make('email', 'Avatar'), ];}Complete documentation about Avatar can be found at https://github.com/laravolt/avatar.
Boolean
The Boolean column displays true or false values as icons. Non-boolean values will be automatically cast to (bool):
use Laravolt\Suitable\Columns\Boolean;public function columns(): array{ return [ Boolean::make('is_active'), ];}Button
The Button column adds buttons that function as navigation to other pages:
use Laravolt\Suitable\Columns\Button;public function columns(): array{ return [ Button::make('permalink', 'Info')->label('Profile')->icon('external link'), ];}In the example above, permalink contains a valid URL, either a hardcoded "http://example.com" or the result of calling Laravel's route() or url() function:
class User extends Model{ public function getPermalinkAttribute() { return route('users.show', $this->id); }}Button::make() also accepts a Closure to dynamically generate URLs:
use Laravolt\Suitable\Columns\Button;public function columns(): array{ return [ // using arrow function syntax Button::make(fn ($user) => route('users.show', $user['id'])), // or the longer traditional way Button::make( function ($user) { return route('users.show', $user['id']); } ), ];}Checkall
The Checkall column adds a checkbox to each row that can be used for multiple selection. Selected IDs can then be sent as parameters when defining Table Action:
use Laravolt\Suitable\Columns\Checkall;public function columns(): array{ return [ Checkall::make('id'), ];}Date
The Date column converts database dates with format 2021-06-02 to a more human-readable format, like June 2, 2021:
use Laravolt\Suitable\Columns\Date;public function columns(): array{ return [ Date::make('created_at'), ];}Additional methods available for the Date column type:
format(string $format)where $format is a string that follows the format accepted by Moment.js.timezone(string $timezone)for automatic date conversion to the appropriate timezone. Valid timezones can be found in the official PHP documentation. Iftimezone()is not explicitly called, the conversion will consider:- The
timezoneattribute of the currently logged-in user:auth()->user()->timezone. - If null, the timezone will be taken from
config('app.timezone').
- The
DateTime
Similar to the Date column, DateTime changes values like 2021-06-02 22:54:00 to June 2, 2021 at 22:45:
use Laravolt\Suitable\Columns\DateTime;public function columns(): array{ return [ DateTime::make('created_at'), ];}The format() and timezone() methods are also available, with the same behavior as the Date column.
Html
The Html column is used when the content to be displayed contains HTML tags, and you want to display it according to HTML format:
public function data(){ return [ ['bio' => '<b>Strong</b> <i>foo</i>'], ];}public function columns(): array{ return [ Html::make('bio') ];}In the example above, the table will display the content as "Strong foo". This column is commonly used when the stored data comes from a WYSIWYG or rich text editor like Redactor or TinyMCE.
Id
The Id column is used to display the primary key of an Eloquent model. Behind the scenes, this column will call getKey(). So make sure to only use this column when the data source comes from Eloquent:
use Laravolt\Suitable\Columns\Id;public function columns(): array{ return [ Id::make(), ];}Image
The Image column is used to display images:
use Laravolt\Suitable\Columns\Image;public function columns(): array{ return [ Image::make('profile_picture') ];}Additional methods available:
height(int $sizeInPixel)to set the image height.width(int $sizeInPixel)to set the image width.alt(string $text)to set thealtattribute (alternate text).
Label
The Label column is used to display a value so it stands out more. Examples of values suitable to be displayed as Label include: status, category, type, and similar attributes:
use Laravolt\Suitable\Columns\Label;public function columns(): array{ return [ Label::make('status'), ];}To add CSS classes to a Label, you can use the addClass method:
use Laravolt\Suitable\Columns\Label;public function columns(): array{ return [ Label::make('status')->addClass('green small'), ];}There are several built-in classes that can be used to determine the color of a Label: red, orange, yellow, olive, green, teal, blue, violet, purple, pink, brown, grey, and black.
In practice, there's a need to give different colors to each value. This can be done using the map() method:
use Laravolt\Suitable\Columns\Label;public function columns(): array{ return [ Label::make('status')->map([ 'active' => 'green', 'banned' => 'red', ]), ];}Number
The Number column is used to display a value in a more human-friendly number format. For example, a value of 1000000 will automatically be changed to 1,000,000 and displayed right-aligned:
use Laravolt\Suitable\Columns\Number;public function columns(): array{ return [ Number::make('salary',) ];}The number format currently used is the format commonly used in Indonesia.
Raw
The Raw column is used to display a value as is (unescaped), without going through the htmlspecialchars function. Be careful when using Raw for a value that comes from user input, as there's a potential for Cross-Site Scripting (XSS):
use Laravolt\Suitable\Columns\Raw;public function data(){ return [ ['bio' => '<b>Strong</b><script>alert("foo")</script>'], ];}public function columns(): array{ return [ Raw::make('bio'), ];}In the example above, we'll get a Strong text (in bold) and the JavaScript code to display an alert will be executed by the browser.
If you need more flexible custom logic, the Raw column type can also accept a Closure:
// Display a list of roles for a user, separated by commasRaw::make( function ($user) { return $user->roles->implode('name', ', '); }, 'Roles'),RestfulButton
The RestfulButton column is used to create standard buttons for a create-read-update-delete or CRUD process. You only need to define the resource name to generate three buttons: show, edit, and destroy:
use Laravolt\Suitable\Columns\RestfulButton;public function columns(): array{ return [ RestfulButton::make('users'), ];}In the example code above, the three buttons generated will have routes:
- show:
route('users.show', <id>) - edit:
route('users.edit', <id>) - destroy:
route('users.destroy', <id>)
<id> is automatically taken from the primary key of the object in question. Therefore, RestfulButton can only be used if the data source comes from Eloquent.
Additional methods available:
only($action1, $action2)if you only want to display certain actions, for exampleonly('show').except($action1, $action2)if you want to hide certain buttons, for exampleexcept('destroy').
To learn more about resource controllers, please read the official documentation from Laravel.
RowNumber
The RowNumber column is used to display row numbers in sequence, starting from 1:
use Laravolt\Suitable\Columns\RowNumber;public function columns(): array{ return [ RowNumber::make(), ];}Text
The Text column is used to display values safely, protected from Cross-Site Scripting (XSS), using PHP's built-in htmlspecialchars function:
use Laravolt\Suitable\Columns\Text;public function data(){ return [ ['bio' => '<b>Strong</b><script>alert("foo")</script>'], ];}public function columns(): array{ return [ Text::make('bio'), ];}In the example above, "bio" will be displayed as-is according to the written text:
<b>Strong</b><script>alert("foo")</script>Text vs Html vs Raw
There are three columns that can be used to display content from WYSIWYG editors containing HTML tags (and JavaScript). Here's the difference between the three:
| Column | Output | Notes |
|---|---|---|
| Text | <b>Strong</b> <script>alert("foo")</script> | Safest, displays text as-is. |
| Html | Strong <script>alert("foo")</script> | If you only want to execute HTML tags. |
| Raw | Strong (and alert appears in the browser) | If you want to fully execute HTML and JavaScript code. |
Url
The Url column is used to automatically display a URL as a clickable link:
use Laravolt\Suitable\Columns\Url;public function columns(): array{ return [ Url::make('website'), ];}View
When the display becomes more complex, we can use the View column to move the logic for rendering the contents of a column to a separate blade file:
use Laravolt\Suitable\Columns\View;public function columns(): array{ return [ View::make('profile') ];}Then create a blade file profile.blade.php:
<dl> <dt>Name</dt> <dd>{{ $data->name }}</dd> <dt>Email</dt> <dd>{{ $data->email }}</dd></dl>Custom Column
If you don't find a suitable column type, then Raw is the first choice to display data with your own custom logic.
If this custom logic is needed in multiple places and you want to apply the Don't Repeat Yourself (DRY) principle, then creating a specific Class for a custom column becomes a wiser choice.
Here's the framework for a custom column that functions to mask the displayed data:
<?phpnamespace App\Tables\Columns;use Laravolt\Suitable\Columns\Column;use Laravolt\Suitable\Columns\ColumnInterface;class MaskColumn extends Column implements ColumnInterface{ public function cell($cell, $collection, $loop) { return \Str::mask($cell->{$this->field}); }}All you need to create is a class that extends Column (base class), implements ColumnInterface, and defines logic to display data in the cell($cell, $collection, $loop) function.
$cell is an item from the Collection (can be an Eloquent model or other object) that will currently be displayed in the cell of a table.
$collection is the entire data (Collection).
$loop contains information about looping, according to Laravel's documentation.
In the example above, the custom column is saved in app/tables/columns. This is not a standard rule. Please adjust the namespace according to your application structure.
Searching
Search Query
When users type something in the search field (searchbox), the input will automatically be bound to the $search property, so we can access it by calling $this->search.
Here's an example code to search by name:
class UserTable extends TableView{ public function data() { return \App\Models\User::where('status', 'ACTIVE') ->whereLike(['name', 'email'], $this->search) ->paginate(); }}
whereLikeis an additional method from Laravolt to search multiple columns at once using thewhere <column> like "%<keyword>%"mechanism. For large amounts of data, this query may not be optimal. Please create your own search logic as needed.
Show/Hide Searchbox
class UserTable extends TableView{ public bool $showSearchbox = false; // default is "true"}Search Debounce
Every time a User types something in the searchbox, the search query will automatically run with an AJAX mechanism. Debounce is a mechanism to wait a few moments until the User is considered to have really stopped typing, then the query is executed to update the displayed data.
class UserTable extends TableView{ public int $searchDebounce = 1000; // in milliseconds, default is 300}Sorting
When defining a table, we can add the sortable() function to any defined column. Automatically, that column will be clickable.
use Laravolt\Suitable\Columns\Text;class UserTable extends TableView{ public function data() { return \App\Models\User::where('status', 'ACTIVE')->paginate(); } public function columns(): array { return [ Text::make('name', 'Name')->sortable(), Text::make('email', 'Email')->sortable(), Raw::make( fn ($data) => DateHelper::formatDate($data->birth_date), 'Birth Date' )->sortable('birth_date'), ]; }}But don't forget, we also need to modify the query so that the resulting data is also sorted. Laravolt has provided the AutoSort Trait to handle this need.
First, make sure the Model that is the data source is already using AutoSort:
namespace App\Models;use Laravolt\Suitable\AutoSort;class User extends Model{ use AutoSort;}Next, we just need to call the autoSort() function when querying the data:
class UserTable extends TableView{ public function data() { return \App\Models\User::where('status', 'ACTIVE') ->autoSort($this->sortPayload()) ->paginate(); }}Filtering
Filtering functions to perform more exact searches. When adding Filtering, try to ensure the table data source is still in the form of a Query Builder. This is necessary because the Filtering logic will be applied after calling data().
class UserTable extends TableView{ public function data() { // NOT OK return \App\Models\User::get(); // NOT OK return \App\Models\User::paginate(); // OK return \App\Models\User::query(); // OK return \App\Models\User::where('status', 'ACTIVE'); }}To add a Filter, create a class with a skeleton like the following:
<?phpnamespace App\Tables\Filters;use Laravolt\Ui\Filters\TextFilter;class EmailFilter extends TextFilter{ protected string $label = 'Email'; public function apply($data, $value) { if ($value) { $data->where('email', $value); } return $data; }}You can change the query logic in the apply method as needed. In the example above, filtering is done with an exact match.
Then add that class to the filters() method of the Table:
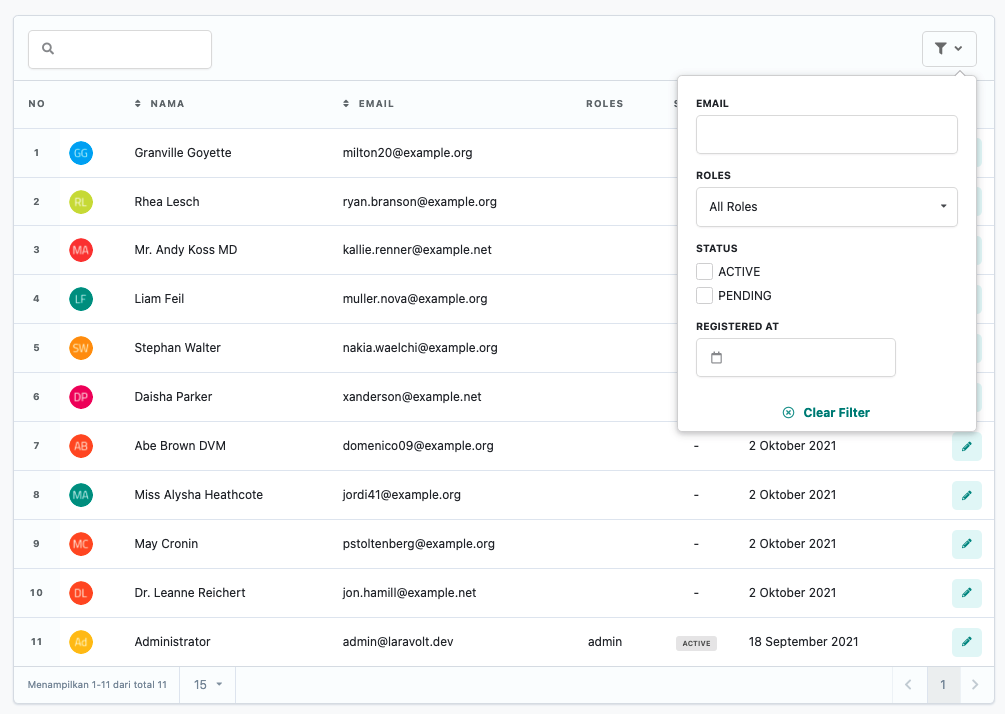
use App\Models\User;use App\Tables\Filters\EmailFilter;class UserTable extends TableView{ public function data() { return User::where('status', 'ACTIVE'); // don't forget to import the class on top with "use" } public function filters(): array { return [ new EmailFilter(), // don't forget to import the class on top with "use" ]; }}The result will look something like this:
Built-in Filters
There are several types of Filters already available and ready to be extended, namely:
- TextFilter
- DropdownFilter
- CheckboxFilter
- DateFilter
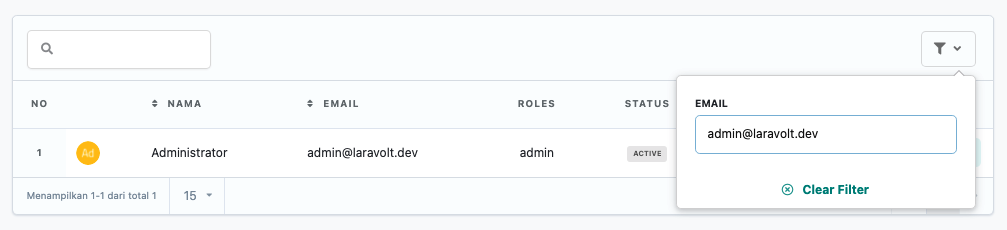
Text Filter
<?phpnamespace App\Tables\Filters;use Laravolt\Ui\Filters\TextFilter;class EmailFilter extends TextFilter{ protected string $label = 'Email'; public function apply($data, $value) { if ($value) { $data->where('email', $value); } return $data; }}Dropdown Filter
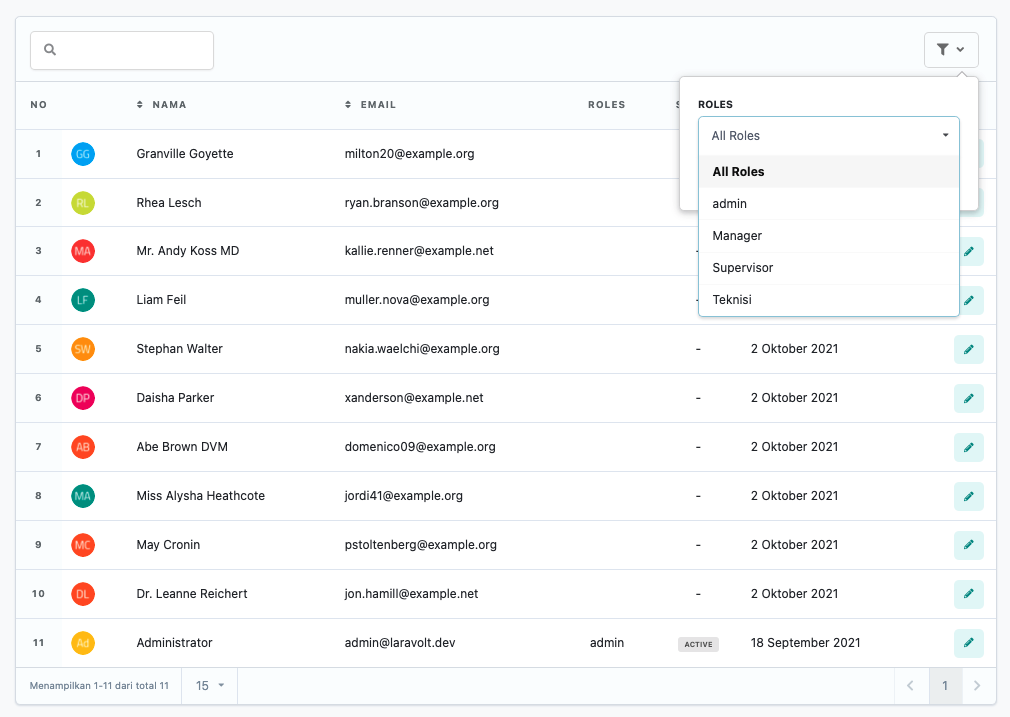
<?phpnamespace App\Tables\Filters;use App\Models\Role;use Laravolt\Ui\Filters\DropdownFilter;class RoleFilter extends DropdownFilter{ protected string $label = 'Roles'; public function apply($data, $value) { if ($value) { $data->whereHas('roles', fn ($query) => $query->where('id', $value)); } return $data; } public function options(): array { return Role::query()->pluck('name', 'id')->prepend('All Roles', '0')->toArray(); }}Checkbox Filter
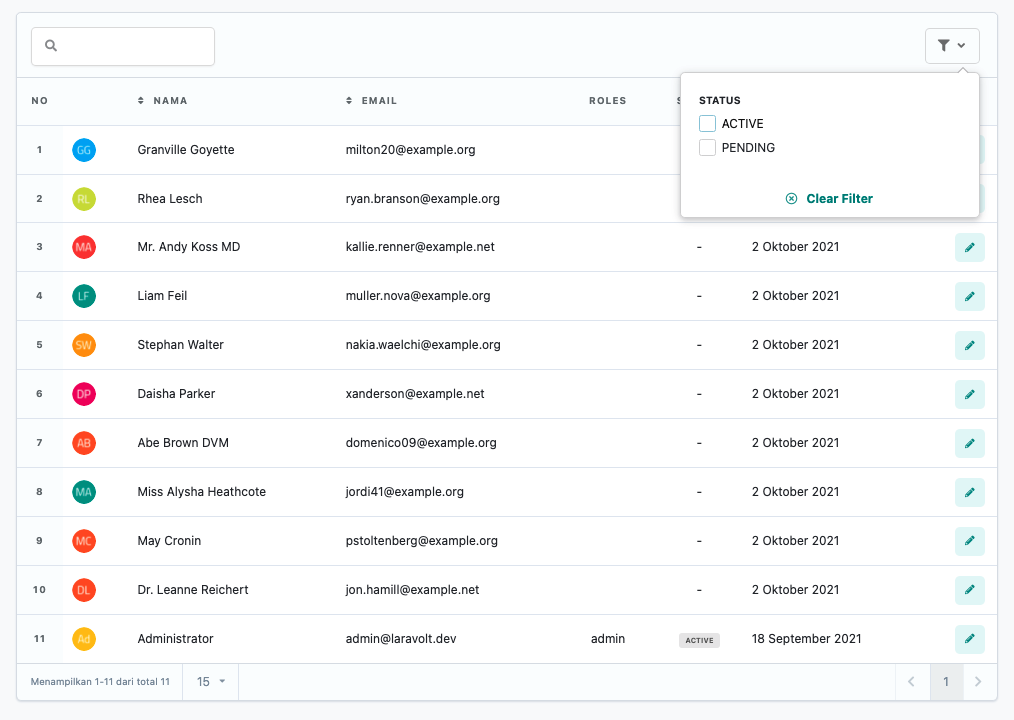
<?phpnamespace App\Tables\Filters;use Laravolt\Ui\Filters\CheckboxFilter;class StatusFilter extends CheckboxFilter{ protected string $label = 'Status'; public function apply($data, $value) { $status = collect($value)->filter()->values()->toArray(); if (! empty($status)) { $data->whereIn('status', $status); } return $data; } public function options(): array { return [ 'ACTIVE' => 'ACTIVE', 'PENDING' => 'PENDING', ]; }}Date Filter
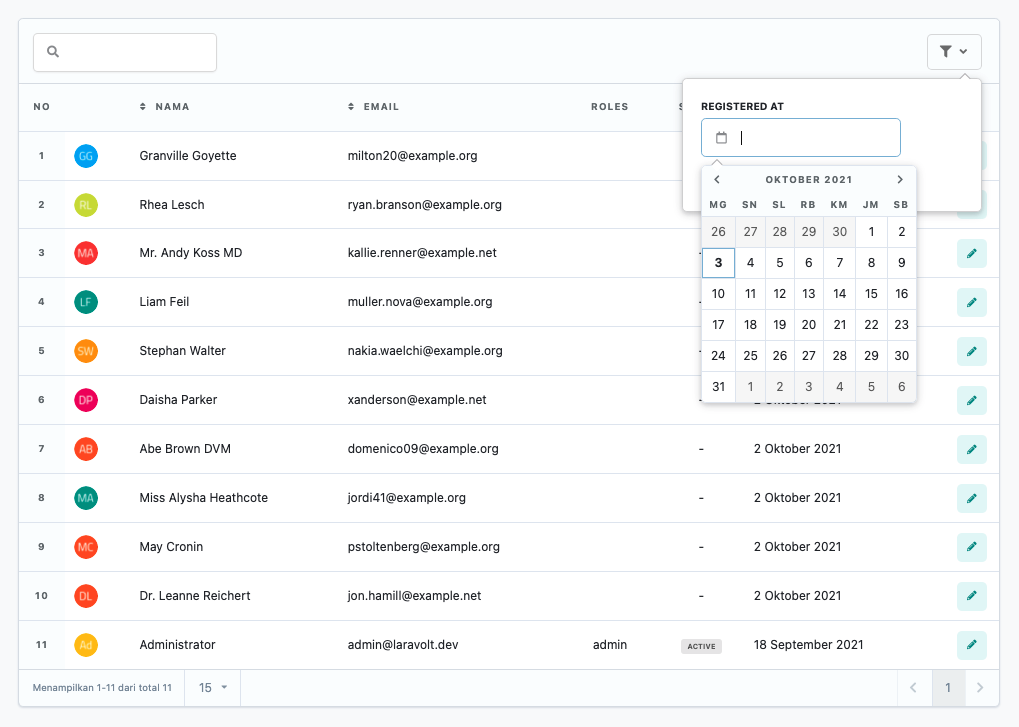
<?phpnamespace App\Tables\Filters;use Laravolt\Ui\Filters\DateFilter;class RegisteredFilter extends DateFilter{ protected string $label = 'Registered At'; public function apply($data, $value) { if ($value) { $data->where('created_at', $value); } return $data; }}Pagination
Pagination will be displayed automatically according to the data source returned in the data() method. Pagination customization can be done by changing several properties:
class UserTable extends TableView{ // change the default number of data shown per page private const DEFAULT_PER_PAGE = 15; // change the options for data shown per page protected array $perPageOptions = [5, 15, 30, 50, 100, 250]; // if you want to change the view protected $paginationView = 'laravolt::pagination.livewire.simple';}Query String
Every time a User interacts with the Table, the current state will be saved as a query string. For example, after searching for data with the keyword "foo", the browser URL will automatically change to:
/users?search=fooThe advantages of explicitly storing state in the URL include:
- Users can easily share the current URL.
- When Users refresh their browser, the displayed data will match the last state.
Here are the states that will automatically change the query string in the browser:
protected $queryString = [ 'page' => ['except' => 1], 'search' => ['except' => ''], 'sort' => ['except' => null], 'direction', 'perPage' => ['except' => self::DEFAULT_PER_PAGE],];Please study Livewire's official documentation regarding query strings.
However, if for some reason you don't want the above behavior (for example when having to display 2 tables on the same page), simply empty the $queryString property:
class UserTable extends TableView{ protected $queryString = [];}Afterwards, whenever Users interact with the table (searching, sorting, filtering, pagination), the browser URL will not change.