Introduction
Hello World
Laravolt integrates seamlessly with Laravel, preserving all the familiar elements you already know. Everything you've learned about Laravel applies to Laravolt without any structural changes, command modifications, or feature limitations. If you know Laravel, you already know how to use Laravolt.
Overview
This guide will walk you through creating a simple dashboard page in Laravolt that will be accessible through the sidebar menu. By the end, you'll have created a fully functional page that demonstrates the core concepts of building applications with Laravolt.
Basic Usage
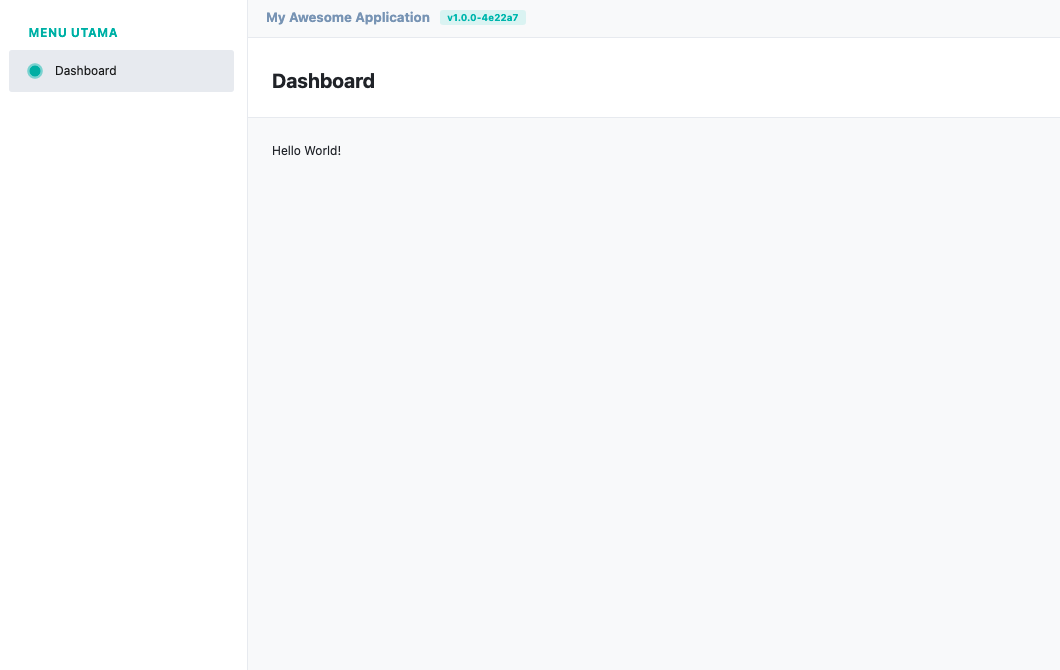
Let's create a dashboard page that can be accessed from the side menu. Here's a step-by-step guide:
1. Creating the Controller
First, generate an invokable controller for our dashboard:
php artisan make:controller DashboardController --invokableThen edit the generated controller to render a view:
<?phpnamespace App\Http\Controllers;use Illuminate\Http\Request;class DashboardController extends Controller{ public function __invoke(Request $request) { return view('dashboard'); }}2. Creating the View
Laravolt provides a command to generate view files with basic structure:
php artisan make:view dashboard --title=DashboardThis creates a file at resources/views/dashboard.blade.php. Open and edit the file to add your content:
<x-volt-app title="Dashboard"> Hello world!</x-volt-app>3. Adding a Route
Define a route for the dashboard in your routes file:
Route::get('dashboard', \App\Http\Controllers\DashboardController::class)->name('dashboard');4. Adding a Menu Item
Configure the dashboard to appear in the sidebar menu by editing the menu configuration:
// config/laravolt/menu/app.phpreturn [ 'App' => [ 'menu' => [ 'Dashboard' => [ 'route' => 'dashboard', ], ], ],];Advanced Features
Code Generators
Laravolt provides several code generators to accelerate development:
php artisan make:view- Create skeleton Blade filesphp artisan make:table- Generate datatable configurationsphp artisan make:chart- Create chart componentsphp artisan make:crud- Generate complete CRUD functionality
These generators help you quickly scaffold common application components with Laravolt's best practices built in.
Blade Components
Laravolt extensively utilizes Laravel's Blade Components for UI construction. We've already seen <x-volt-app> for page layouts, but Laravolt includes many more:
<x-volt-panel>- Content panels with headers and footers<x-volt-grid>- Grid layouts for responsive design<x-volt-icon>- Icon components with consistent styling- And many more...
Best Practices
When building applications with Laravolt, consider these recommendations:
Use Blade Components: Leverage the built-in components to ensure UI consistency and reduce redundant code.
Organize Menu Configuration: Keep your menu structure clean and intuitive in the configuration files.
Stick to Defaults: Most applications work well with Laravolt's default configuration. Only customize when necessary.
Encapsulate UI Logic: Use components to hide styling (CSS) and logic (JavaScript), keeping your blade files clean and focused on structure.
Troubleshooting
Menu Items Not Appearing
If your menu items don't appear in the sidebar:
- Verify that the route name in the menu configuration matches the defined route
- Check user permissions if you're using Laravolt's ACL features
- Clear configuration cache with
php artisan config:clear
View Not Rendering Correctly
If your view doesn't look as expected:
- Ensure you're using the correct Blade components
- Check for missing CSS or JS assets
- Verify that the view name matches what's referenced in your controller
Related Components/Features
- Menu Configuration - Learn more about configuring application menus
- Blade Components - Explore all available UI components
- Form Building - Create interactive forms with Laravolt
- Table Management - Display and manage data in tables